
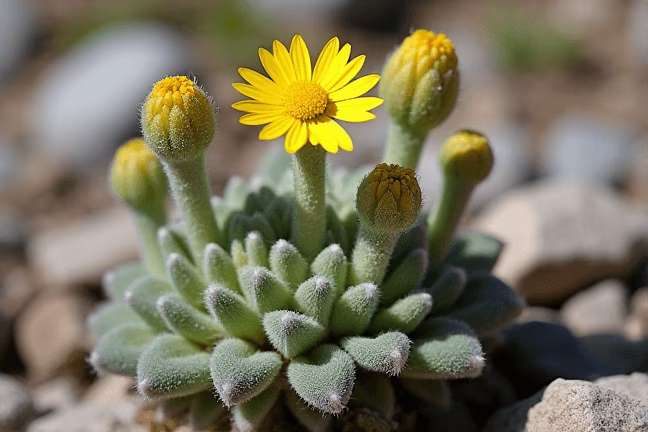
Dwarf Hulsea
Hulsea nana
Grow Time
90-120 days
Sunlight
Full Sun
Watering
Every 5-7 days
Toxicity
Non-toxic
How to plant Dwarf Hulsea: Step-by-Step Guide
Growing Guide
Preparation
Choosing the Right Spot: Dwarf Hulsea is a lovely little plant that thrives in sunny, dry conditions. It’s perfect for rock gardens or areas where you want something low-growing and vibrant. Since it's native to higher elevations and dry environments, it prefers well-draining soil. You don’t need rich soil—just something that doesn’t hold too much water.
What You'll Need:

Dwarf Hulsea seeds (or if you’re lucky enough to find them, small seedlings)

A pot with drainage holes or a garden spot that gets full sun

Sandy or gravelly soil (if your soil is heavy, mix in some sand or small stones to improve drainage)

A watering can with a gentle spout
Timing: You’ll want to plant your Dwarf Hulsea in early spring after the last frost has passed. This plant likes cooler temperatures when it starts growing but will also tolerate some warmth as it matures.
Tip: If you live in an area with hot summers, consider planting it in a spot with a bit of afternoon shade to prevent it from drying out too quickly.
Planting
If Using Seeds:
- Fill a small pot or prepare a patch in your garden with sandy, well-draining soil.
- Scatter the seeds lightly on top of the soil — don’t bury them too deep! Just gently press them into the surface so they have contact with the soil.
- Water them very lightly. The soil should be damp but not soaking wet.
- Place the pot or garden bed in a sunny spot. These plants love light!
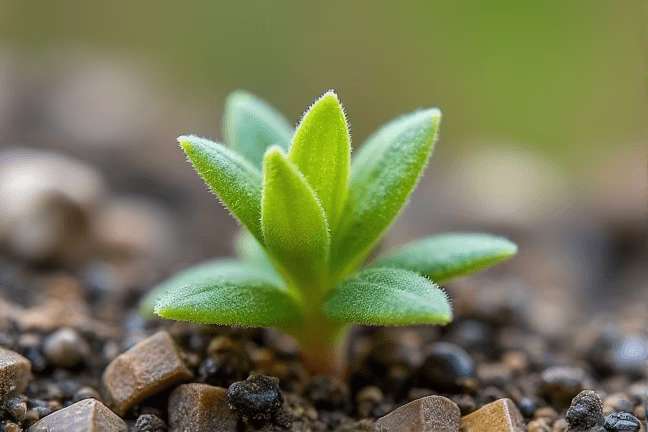
- Germination usually takes about 7-14 days. Be patient!
If Using Seedlings:
- Dig a small hole in your prepared soil, just big enough to fit the root ball of the seedling.
- Place the seedling in the hole and gently cover the roots with soil, pressing down lightly around the base.
- Water carefully around the base of the plant, avoiding getting too much water on the leaves.
Spacing Tip: If you're planting multiple Dwarf Hulsea plants, give them about 6-8 inches (15-20 cm) of space between each one so they have room to spread out without overcrowding.
Pro Tip: After planting, add a thin layer of gravel or small stones around the base of the plant. This helps keep the soil dry and prevents the plant from sitting in water, which it dislikes.
Growing Care
Watering: Dwarf Hulsea doesn’t like staying wet for long periods, so water sparingly. Once the plant is established (after a few weeks), you’ll only need to water it every 1-2 weeks, depending on how dry your climate is. Always check the soil first—if the top inch feels dry, it’s time to water.
Sunlight Needs: This plant loves sunlight! Make sure it gets at least 6 hours of direct sunlight a day. If you live in a really hot climate, a little afternoon shade can help protect it from scorching.
Fertilizing: Good news—you don’t need to fertilize Dwarf Hulsea! Over-fertilizing can actually harm this plant because it prefers poor, rocky soils. If you feel like it needs a little boost, you can use a very diluted, low-nitrogen fertilizer once or twice during the growing season, but it’s not necessary.
Dealing with Pests: Dwarf Hulsea is pretty tough and doesn’t attract many pests. However, if you notice any bugs or critters munching on the leaves, you can spray the plant with a mix of water and mild soap to deter them.
Pruning: You don’t need to prune Dwarf Hulsea much, but if you want a neater look, you can trim back any leggy stems after it finishes flowering. This will encourage bushier growth next season.
Harvesting
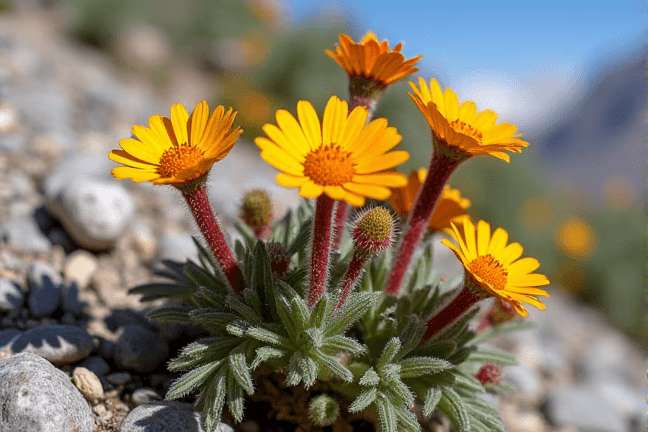
When to Enjoy the Blooms: Dwarf Hulsea typically blooms in late spring to early summer, producing cheerful yellow flowers with orange centers. While this plant isn’t grown for harvesting like vegetables or herbs, you can still "harvest" its beauty by cutting a few flowers to bring indoors for a small bouquet.
How to Cut Flowers:
- Use clean scissors or pruning shears to snip off a few stems just above a leaf node (where the leaves meet the stem).
- Place the cut flowers in a small vase with water to enjoy their bright colors indoors.
After Flowering: Once the flowers fade, the plant will start to set seed. If you’d like to collect seeds for next year, let the flower heads dry on the plant. Then, shake the dried heads into a paper bag to collect the tiny seeds. Store them in a cool, dry place until you’re ready to plant again.
End of Season Care: As a perennial in some climates, Dwarf Hulsea may come back next year. In colder areas, it might act as an annual, completing its life cycle in one season. If you’re hoping for it to return, avoid overwatering in the fall and winter, as soggy conditions can rot the roots.
Plant Care FAQ
Q: Why are my Dwarf Hulsea leaves turning yellow?
A: Yellow leaves usually mean the plant is getting too much water. Remember, this plant likes dry conditions! Let the soil dry out completely before watering again, and make sure your soil is draining well.
Q: Can I grow Dwarf Hulsea indoors?
A: While it’s possible to grow it indoors, it’s not ideal. Dwarf Hulsea really thrives in outdoor sunlight and dry conditions. If you do try indoors, place it near a very sunny window and avoid overwatering.
Q: Do I need to deadhead the flowers?
A: Deadheading (removing spent flowers) isn’t strictly necessary, but it can help keep the plant looking tidy and may encourage more blooms. Simply pinch off the faded flowers with your fingers.
Q: My plant looks sparse. What can I do?
A: If your plant seems leggy or sparse, it might not be getting enough sunlight. Try moving it to a sunnier spot, or trim it back a bit to encourage bushier growth.
Q: Is Dwarf Hulsea safe around pets?
A: Yes, this plant is non-toxic and safe around pets. However, as with any plant, it’s always good to discourage nibbling since some animals might experience mild stomach upset if they eat too much.
Pro Tips
1. Embrace Rock Gardens
Dwarf Hulsea is perfect for rock gardens because it thrives in poor, well-draining soil. Pair it with other drought-tolerant plants like sedum or lavender for a beautiful, low-maintenance display.2. Less is More with Water
When in doubt, water less! Many beginners tend to overwater, but Dwarf Hulsea will thank you for keeping things on the drier side.3. Companion Planting
Plant Dwarf Hulsea alongside other sun-loving, drought-tolerant plants such as succulents or ornamental grasses. They’ll all thrive in similar conditions and create a striking landscape.4. Protect from Heavy Rain
If you live in an area with frequent rain, consider placing your Dwarf Hulsea under a small garden canopy or eave to protect it from too much moisture.5. Extend Blooming Time
To encourage longer blooming, remove spent flowers regularly. This tricks the plant into producing more blooms instead of focusing on seed production.6. Winter Protection
In colder climates, add a light layer of mulch around the base of the plant in late fall to help protect the roots from freezing temperatures.7. Naturalize Over Time
If you’re planting Dwarf Hulsea in a suitable environment (dry, sunny, well-draining), it may reseed itself naturally over time, creating a lovely, self-sustaining patch of color.